The Pre-Planting procedure is essential in order to prevent problems and difficulties during the growing period.
- First Stage – While placing Pelemix’s growbags on top of the gutter, it is important to make sure that the side of the logo is the upper side.
- Second Stage – Make sure that the pressed material is in the middle of the plastic bag and that the plastic edges are pointed upward.


The distance between growbags should be according to the planting program. In any case, the distance between two pressed slabs should be no less then 2 cm (about two fingers).


3. Third Stage
Install an arrow dripper every 20 cm (or less). The recommended flow rate is 1 Liter/hour or less. When the coir is pressed it is impossible to tack the arrow dripper, therefore it is important to insert all of it into the plastic bag


The holes in the plastic can be done with a sharp object like a screwdriver.
4. Forth Stage
The quantity of water that is needed for a growbag to expand is about 70% of its final volume. For example, the quantity needed to expand 18 liters growbag (100x15x12) is about 12 liters.
5. Fifth Stage
During the expansion, it is very important to apply a calcium nitrate treatment. To every expanded cubic meter [1000 liters] of coir, 3 kg of calcium nitrate must be applied.
For example: 55 growbags of 18 liters each comprise a cubic meter of expanded coir. The easiest way to apply the calcium nitrate is through the water
used for expansion. For example the quantities for 55 growbags of 18 liters are: 660 liters of water and 3 kg of calcium nitrate.
It is recommended to apply this treatment in a few irrigation cycles. After the full treatment (after completion of all irrigation cycles) is given, the material should be suspended for 48 hours.
6. Sixth Stage
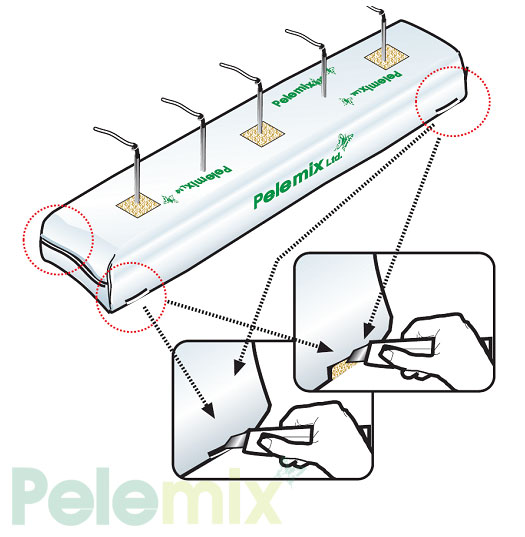
After 48 hours, drainage holes must be made. The holes must be made on both sides of the growbag, on the corner between the side and the bottom of the grow bag (On the edge of the growbag). Each hole must be 6-8 cm long. There should be at least four draining holes in total.
 It is also possible to purchase the growbags with planting holes and drainage holes. In such a case, the only change would be that the calcium nitrate treatment should be applied by smaller portions of water and through more cycles.
7. Seventh Stage
The growbags must be washed with clean tap water. Wshing will reduce the E.C. level of the drainage water to the level of the tap water. This procedure may take time and water, but is crucial for the growth of the plant.
8. Eight Stage
During or after washing, planting holes should be made and the arrow drippers should be reinserted into the growbag.

9. Ninth Stage
After washing is finished, the growbags must be irrigated for 4 days with a complete Fertigation formula.
When the 9 stage is successfully completed, the growbag is ready for planting.